Archivo de la etiqueta: cotton

Judas’ bag

Publicado en

*Versión en español aquí*

Bolsita_elefante_cl

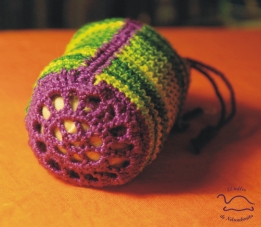
Today we’ll describe a cute and useful craft. As soon as I made it somebody baptized it as “Judas’ bag”, so that’s how I’ll call it from now on =) It is a little cylindrical bag, whose mouth can be closed tying two little cords. It’s crocheted using cotton thread.

These are the steps I followed:

1 – Crochet a rectangle with some figure or motif in it. Make some little semicircles on one of the long sides to pass the cords we’ll use to close the bag when it’s finished.


Bolsita_culo_cl

The openwork base shows the lining fabric. If we choose two contrasting colors it’ll look really nice

2 – Crochet an openwork circular base.

3 – Sew the two short sides of the rectangle to form a tube and sew the circular base to the side of the side of the tube that has no semicircles crocheted.

4 – Sew a fabric lining for the inside. It’ll look nicer and the crochet won’t stretch with the use.

5 – Make a couple of cords using the same thread that was used to crochet the bag. They’re very easy to make; you only need some thread and your fingers. Click here to see a video that explains the technique.

These little bags may be very useful. You can use them to carry jewellery when travelling, to store your headphones and prevent their cord to get tangled, to carry coins…

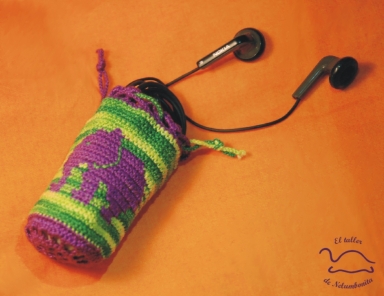
Bolsita_kiskos_cl

Renewing the closet I – a new top from an old one

Camiseta original

This was the original top. I didn’t like its small neck, so I decided to make it larger

*Versión en español aquí*

We open our recycling section with a very common object: that t-shirt we once bought and don’t like any more but is still in too good condition for using it as cloth. In my case, I didn’t wear this long sleeve top because I found it quite boring and also had a very small neck that wasn’t really fetching. I don’t like dumping things that are still usable, so I decided to try my sewing skills and modify the top to make it look better.

Corte para ampliar el cuello de la camiseta

Marking where to cut the new neck

Detalle de pespunte del cuello de la camiseta

A detail of the backstitch in the neck

First I cut a wide neck, using another top I had as a pattern. After cutting, I sewed a little turn-up to prevent the fabric from fraying and make the result look nicer. To prevent the new neck from stretching I sewed it using backstitch.

Blonda utilizada para rematar cuello y puñosNow we can add something to decorate the top. I chose a black blond lace, a quite narrow one that looked nice but not excessive. I sewed it to the inner part of the neck, and sewed little wrinkles at the “corners” to make it fit better. And I added the same blond lace to the cuffs. In my case, for a medium size top (UK 12, USA M/10) I needed 75 cm (29.5 inches) of blond lace.

Aspecto de la camiseta reformada

This is the final result. Now I’m thinking on adding some blond lace to the lower part, or some embroidery to the neck…any ideas?

Crochet wallet

*Versión en español aquí*

This is a simple and light wallet for those who need something that easily fits into any pocket. I have used cotton thread to crochet it. It has some advantages over paper wallets, as it is more malleable and more resistant.

Cartera_ganchillo

Cartera_ganchillo_abierta

In this case I didn’t include any compartment for bills but it could be easily added, or otherwise we could put the bills in one of the card pockets. But this is basically a wallet to carry a couple of cards and some coins (for the coffee machine, for example).

Cartera_ganchillo_monedas@

Paper wallets

*Versión en español aquí*

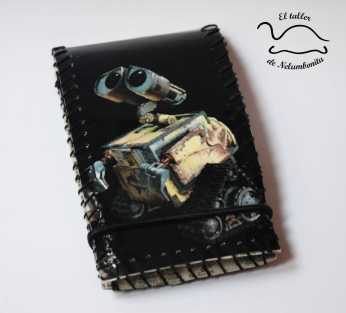
This craft was in fashion some years ago. I remember making little purses out of plastified comic pages, sewing them with coloured cotton thread. We sold it at school to get some money for our study travel =)

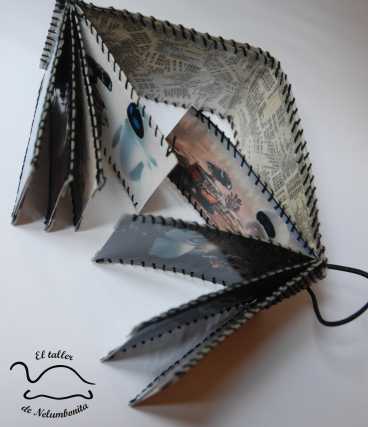
Here I show one of the wallets I have been making since I learned the technique. Sometimes we look for something that fits in our pocket, that is not very thick…the best solution: DIY!
The wallet is made using images downloaded from the Internet. For the inside I have used both printed frames and newspaper. This time I did not include a purse for the coins, since the wallet was only intended for holding cards and bills. If we’d like to include a purse, we’d just put the card holders in one side, and sew a little bag with a cover that can be held close with velcro in the other side. In the inside of the card “pockets” we can cut a little window that allows us to see easily what is in the inside.

Cartera walle cerrada @

Cartera walle abierta @

As a big version of the idea I made some classifying folders for my notes. The first one had plastic bags, and the second one cardboard sheets to separate compartments. They look pretty old now but still work nicely. And since they were designed by me, they are unique =)

Amigurumies

*Versión en español aquí*

Amigurumies are crocheted or knitted stuffed toys. This is actually a Japanese art, where different figures (mainly animals) are crocheted and then stuffed with cotton, cloth or seeds. Once we get to know the technique, we can make our own designs. There are several simple patterns in the Internet that we can use as an easy start. This mouse is an example:

This little mouse is easy to make. Click on the image to open tutorial (in Spanish)

This little mouse is easy to make. Click on the image to open tutorial (in Spanish)

Learning how to make spheres may be very useful for many designs, since most amigurumies are made of several spheres of different sizes.

Ragamuffin, a character from “Lenore, the cute little dead girl

Ragamuffin, a character from “Lenore, the cute little dead girl

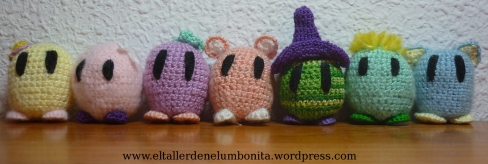
Inspired by the videogame “Teeworlds”

Inspired by the videogame «Teeworlds»